Saturday, June 27, 2009
Monday, June 15, 2009
B&W N wash-out photo

1/2000 f5.6 ISO200
Nikon D5000
location : Regency Heights - Garden of Eve?
Original photo taken in colour but i decided to change it to B&W using photoshop - Channel Mixer.
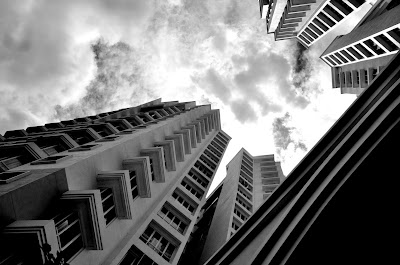
location : Regency Heights
Another colour photo converted to Black & White using Photoshop Channel Mixer.
location : Regency Heights - Garden of Eve?
Original photo taken in colour but i decided to change it to B&W using photoshop - Channel Mixer.

1/800 f5.6 ISO200
Nikon D5000location : Regency Heights
Another colour photo converted to Black & White using Photoshop Channel Mixer.

1/800 f4.5 ISO200
Nikon D5000
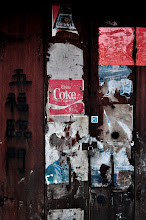
location : Majestic Cinema
location : Majestic Cinema
![Reblog this post [with Zemanta]](http://img.zemanta.com/reblog_e.png?x-id=3be802ea-3c4e-4f18-be3d-9e5cb5a7622f)
Thursday, June 11, 2009
cross processing...anyone?
In the old days before digital photography (the dark(room) times, as I like to call them!) film was processed using chemicals. Different types of film needed different sets of chemicals. Slide film needed one set, a different set was needed for black and white, another for colour . . . and so on.
But what if you used the C41 chemicals to process, lets say, slide film? Well, the effect is that photographs have both a high contrast and a colour cast to them.
The colour cast could actually look quite artistic. Photographers made use of this to deliberately create an artistic look to their photographs.
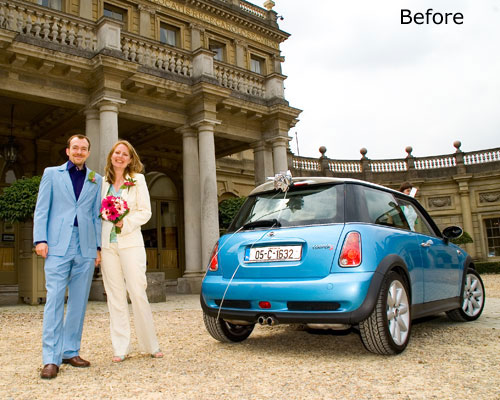
The look has become more popular recently because it's found its way into magazine adverts. It has consequently become popular for wedding photography as couples look for more artistic wedding photography.
If you’ve never seen a cross processed image there’s a wedding photography example below, together with a Photoshop tutorial to show you how to achieve this cross processing effect.
Roll your mouse over the photograph below to see the before and after effect of cross processing.
NB: In the tutorial, words in bold dark green refer to menus and menu items in Photoshop.
Click on the diagonal line – marked by the arrows above - and pull the left hand end down a little, and the right hand end up a little. This creates an “S” shape curve.
Your photo should instantly have more contrast. You're on your way to creating the effect!
Photoshop cross processing tutorial - step two:
Create another curve adjustment layer, like you did in step 1 above (select Layer, then New Adjustment Layer then Curves…)
This time we are only going to be adjusting the “Red” part of the photograph. Have a look at the screenshot below:
There are three steps to take here. Taking one arrow at a time:
Create a third curve adjustment layer, like you did in steps 1 and 2 above (select Layer, then New Adjustment Layer then Curves…)
This time we are only going to be adjusting the “Blue” part of the photograph. Have a look at the screenshot below:
The steps to take here are similar to the “Red” adjustment above:
The last part is easy. If you press F7 on your keyboard, the Layer palette will appear. You will have four layers – your image, and then three curve adjustment layers.
If you think your image could do with a little more contrast, double click the bottom curves layer and adjust the “S” shape.
If you think it could be a little redder, click the middle layer and adjust the “S” shape curve.
Finally, if you think a little bluer would work well for your digital photo, select the top curve layer and adjust the inverse “S” shaped curve.
Once you are happy with your image, go to Layer, then select Flatten image.![Reblog this post [with Zemanta]](http://img.zemanta.com/reblog_e.png?x-id=df23651c-2c91-4507-9e05-2475725eb492)
- NB:If you have an old colour film lying around, have a look at the label on the side. It probably says “C41 process”. This tells the film processor which chemical set to use (C41 was the most common set for colour film).
But what if you used the C41 chemicals to process, lets say, slide film? Well, the effect is that photographs have both a high contrast and a colour cast to them.
The colour cast could actually look quite artistic. Photographers made use of this to deliberately create an artistic look to their photographs.
The look has become more popular recently because it's found its way into magazine adverts. It has consequently become popular for wedding photography as couples look for more artistic wedding photography.
If you’ve never seen a cross processed image there’s a wedding photography example below, together with a Photoshop tutorial to show you how to achieve this cross processing effect.
Roll your mouse over the photograph below to see the before and after effect of cross processing.
NB: In the tutorial, words in bold dark green refer to menus and menu items in Photoshop.
Making the effect using Photoshop - tutorial
Photoshop cross processing tutorial - step one:
Have a browse through your photos. Choose something that will suit the cross processing style – photos of people are always a good choice.
Open your image in Photoshop. We’re going to create the effect using curves. To do this, select Layer, then New Adjustment Layer and finally Curves…
A new dialog box will pop up, and here you can enter a name if you like. If not, just click on OK.
Once you have done this, the curves dialog box will appear. It should look something like the screenshot below:
Click on the diagonal line – marked by the arrows above - and pull the left hand end down a little, and the right hand end up a little. This creates an “S” shape curve.
Your photo should instantly have more contrast. You're on your way to creating the effect!
Add some colour cast
Now you have the contrast, we need to add a colour cast.Photoshop cross processing tutorial - step two:
Create another curve adjustment layer, like you did in step 1 above (select Layer, then New Adjustment Layer then Curves…)
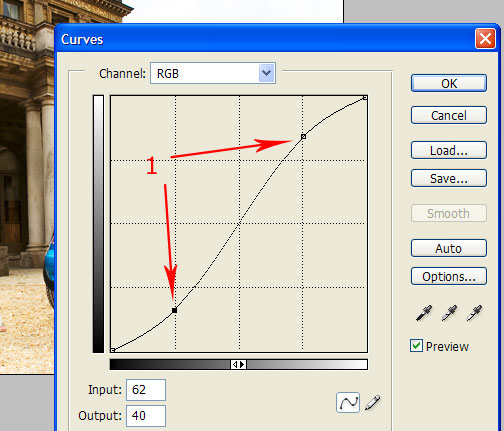
This time we are only going to be adjusting the “Red” part of the photograph. Have a look at the screenshot below:
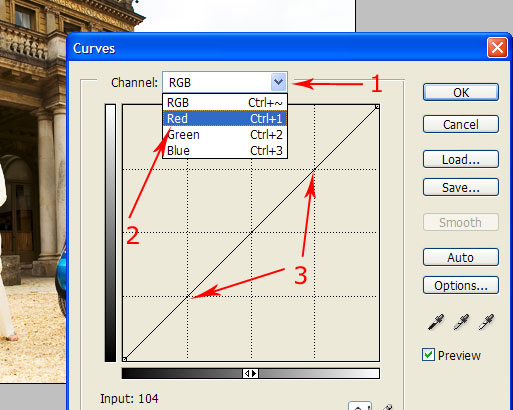
There are three steps to take here. Taking one arrow at a time:
- Click on the down arrow of the drop down box (arrow 1). A menu pops down.
- Select “Red” from this new menu (arrow 2).
- Finally, create another shallow “S” shape to the curve, like you did for Photoshop cross processing tutorial - step 1 above (arrow 3).
More colour cast
Photoshop cross processing tutorial - step three:Create a third curve adjustment layer, like you did in steps 1 and 2 above (select Layer, then New Adjustment Layer then Curves…)
This time we are only going to be adjusting the “Blue” part of the photograph. Have a look at the screenshot below:
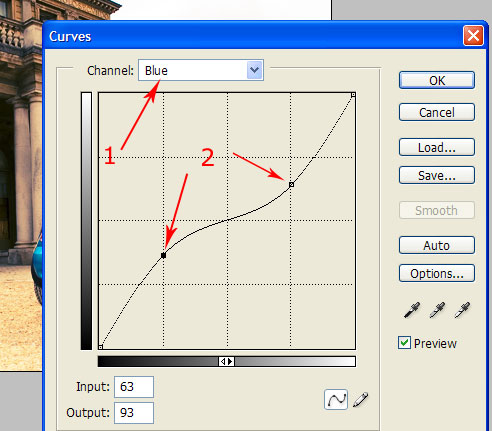
The steps to take here are similar to the “Red” adjustment above:
- Click on the down arrow of the drop down box, but this time select “Blue”(arrow 1).
- Then, create another shallow, but this time an inverse “S” shape to the curve (arrow 2).
Finishing up
Photoshop cross processing tutorial - step four:The last part is easy. If you press F7 on your keyboard, the Layer palette will appear. You will have four layers – your image, and then three curve adjustment layers.
If you think your image could do with a little more contrast, double click the bottom curves layer and adjust the “S” shape.
If you think it could be a little redder, click the middle layer and adjust the “S” shape curve.
Finally, if you think a little bluer would work well for your digital photo, select the top curve layer and adjust the inverse “S” shaped curve.
Once you are happy with your image, go to Layer, then select Flatten image.
Saturday, June 6, 2009


Nikon D5000


My new camera, which is a surprise from my darling.
D5000 with kit lens 18-55mm (3.5f-5.5f) VR
This model is not yet available in Malaysia the time i got the present. It was purchased from Singapore by a friend.
D5000 with kit lens 18-55mm (3.5f-5.5f) VR
This model is not yet available in Malaysia the time i got the present. It was purchased from Singapore by a friend.
Subscribe to:
Posts (Atom)