Saturday, June 27, 2009
Monday, June 15, 2009
B&W N wash-out photo

1/2000 f5.6 ISO200
Nikon D5000
location : Regency Heights - Garden of Eve?
Original photo taken in colour but i decided to change it to B&W using photoshop - Channel Mixer.
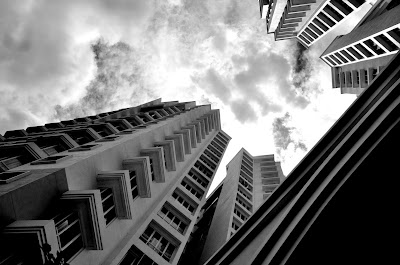
location : Regency Heights
Another colour photo converted to Black & White using Photoshop Channel Mixer.
location : Regency Heights - Garden of Eve?
Original photo taken in colour but i decided to change it to B&W using photoshop - Channel Mixer.

1/800 f5.6 ISO200
Nikon D5000location : Regency Heights
Another colour photo converted to Black & White using Photoshop Channel Mixer.

1/800 f4.5 ISO200
Nikon D5000
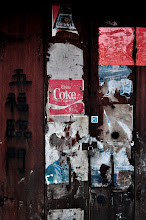
location : Majestic Cinema
location : Majestic Cinema
![Reblog this post [with Zemanta]](http://img.zemanta.com/reblog_e.png?x-id=3be802ea-3c4e-4f18-be3d-9e5cb5a7622f)
Thursday, June 11, 2009
cross processing...anyone?
In the old days before digital photography (the dark(room) times, as I like to call them!) film was processed using chemicals. Different types of film needed different sets of chemicals. Slide film needed one set, a different set was needed for black and white, another for colour . . . and so on.
But what if you used the C41 chemicals to process, lets say, slide film? Well, the effect is that photographs have both a high contrast and a colour cast to them.
The colour cast could actually look quite artistic. Photographers made use of this to deliberately create an artistic look to their photographs.
The look has become more popular recently because it's found its way into magazine adverts. It has consequently become popular for wedding photography as couples look for more artistic wedding photography.
If you’ve never seen a cross processed image there’s a wedding photography example below, together with a Photoshop tutorial to show you how to achieve this cross processing effect.
Roll your mouse over the photograph below to see the before and after effect of cross processing.
NB: In the tutorial, words in bold dark green refer to menus and menu items in Photoshop.

Click on the diagonal line – marked by the arrows above - and pull the left hand end down a little, and the right hand end up a little. This creates an “S” shape curve.
Your photo should instantly have more contrast. You're on your way to creating the effect!
Photoshop cross processing tutorial - step two:
Create another curve adjustment layer, like you did in step 1 above (select Layer, then New Adjustment Layer then Curves…)
This time we are only going to be adjusting the “Red” part of the photograph. Have a look at the screenshot below:
There are three steps to take here. Taking one arrow at a time:
Create a third curve adjustment layer, like you did in steps 1 and 2 above (select Layer, then New Adjustment Layer then Curves…)
This time we are only going to be adjusting the “Blue” part of the photograph. Have a look at the screenshot below:
The steps to take here are similar to the “Red” adjustment above:
The last part is easy. If you press F7 on your keyboard, the Layer palette will appear. You will have four layers – your image, and then three curve adjustment layers.
If you think your image could do with a little more contrast, double click the bottom curves layer and adjust the “S” shape.
If you think it could be a little redder, click the middle layer and adjust the “S” shape curve.
Finally, if you think a little bluer would work well for your digital photo, select the top curve layer and adjust the inverse “S” shaped curve.
Once you are happy with your image, go to Layer, then select Flatten image.![Reblog this post [with Zemanta]](http://img.zemanta.com/reblog_e.png?x-id=df23651c-2c91-4507-9e05-2475725eb492)
- NB:If you have an old colour film lying around, have a look at the label on the side. It probably says “C41 process”. This tells the film processor which chemical set to use (C41 was the most common set for colour film).
But what if you used the C41 chemicals to process, lets say, slide film? Well, the effect is that photographs have both a high contrast and a colour cast to them.
The colour cast could actually look quite artistic. Photographers made use of this to deliberately create an artistic look to their photographs.
The look has become more popular recently because it's found its way into magazine adverts. It has consequently become popular for wedding photography as couples look for more artistic wedding photography.
If you’ve never seen a cross processed image there’s a wedding photography example below, together with a Photoshop tutorial to show you how to achieve this cross processing effect.
Roll your mouse over the photograph below to see the before and after effect of cross processing.
NB: In the tutorial, words in bold dark green refer to menus and menu items in Photoshop.
Making the effect using Photoshop - tutorial
Photoshop cross processing tutorial - step one:
Have a browse through your photos. Choose something that will suit the cross processing style – photos of people are always a good choice.
Open your image in Photoshop. We’re going to create the effect using curves. To do this, select Layer, then New Adjustment Layer and finally Curves…
A new dialog box will pop up, and here you can enter a name if you like. If not, just click on OK.
Once you have done this, the curves dialog box will appear. It should look something like the screenshot below:
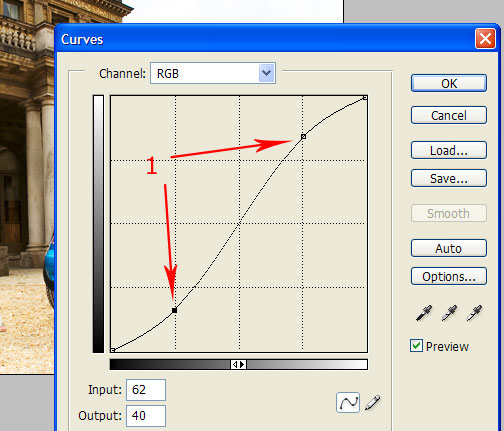
Click on the diagonal line – marked by the arrows above - and pull the left hand end down a little, and the right hand end up a little. This creates an “S” shape curve.
Your photo should instantly have more contrast. You're on your way to creating the effect!
Add some colour cast
Now you have the contrast, we need to add a colour cast.Photoshop cross processing tutorial - step two:
Create another curve adjustment layer, like you did in step 1 above (select Layer, then New Adjustment Layer then Curves…)
This time we are only going to be adjusting the “Red” part of the photograph. Have a look at the screenshot below:
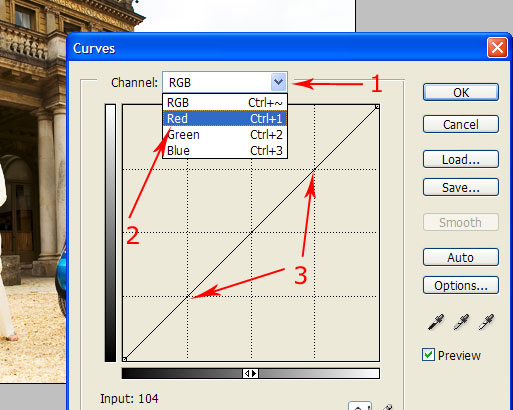
There are three steps to take here. Taking one arrow at a time:
- Click on the down arrow of the drop down box (arrow 1). A menu pops down.
- Select “Red” from this new menu (arrow 2).
- Finally, create another shallow “S” shape to the curve, like you did for Photoshop cross processing tutorial - step 1 above (arrow 3).
More colour cast
Photoshop cross processing tutorial - step three:Create a third curve adjustment layer, like you did in steps 1 and 2 above (select Layer, then New Adjustment Layer then Curves…)
This time we are only going to be adjusting the “Blue” part of the photograph. Have a look at the screenshot below:
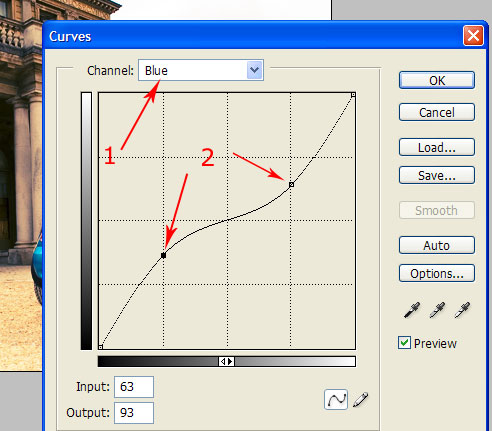
The steps to take here are similar to the “Red” adjustment above:
- Click on the down arrow of the drop down box, but this time select “Blue”(arrow 1).
- Then, create another shallow, but this time an inverse “S” shape to the curve (arrow 2).
Finishing up
Photoshop cross processing tutorial - step four:The last part is easy. If you press F7 on your keyboard, the Layer palette will appear. You will have four layers – your image, and then three curve adjustment layers.
If you think your image could do with a little more contrast, double click the bottom curves layer and adjust the “S” shape.
If you think it could be a little redder, click the middle layer and adjust the “S” shape curve.
Finally, if you think a little bluer would work well for your digital photo, select the top curve layer and adjust the inverse “S” shaped curve.
Once you are happy with your image, go to Layer, then select Flatten image.
Saturday, June 6, 2009


Nikon D5000


My new camera, which is a surprise from my darling.
D5000 with kit lens 18-55mm (3.5f-5.5f) VR
This model is not yet available in Malaysia the time i got the present. It was purchased from Singapore by a friend.
D5000 with kit lens 18-55mm (3.5f-5.5f) VR
This model is not yet available in Malaysia the time i got the present. It was purchased from Singapore by a friend.
Wednesday, May 13, 2009
Nikon TTL Flashes
Guide to Nikon TTL Flashes
by Shun Cheung
Photography is about creating images with light. For indoor, night, fill light, or certain special effects, using electronic flashes to generate light becomes an important component in modern photography. Nikon’s current flash technology is called i-TTL, and they offer five different external flash options. So far all of those i-TTL flashes have three-digit model numbers in the form of SB-n00 (e.g. SB-600, SB-900 and there is also an SB-R200) while the older, non-i-TTL flashes have two-digit model numbers (e.g. SB-28 and SB-80 DX). Therefore, it is very easy to determine which ones are i-TTL compatible. This article provides a brief history of the evolution of Nikon TTL flash technology and a guide to those five i-TTL flashes.
The intro image demonstrates the size differences amongst the SB-900, SB-800 and SB-600.
The Introduction of Digital and D-TTL
Nikon introduced the TTL (through-the-lens) flash technology to its film SLRs (Single-Lens Reflex Cameras) in the mid 1980’s. The major advantage of TTL flash is that flash exposure is measured during the actual exposure, as the amount of light reflected off the film is detected by sensors placed inside the mirror box. When a sufficient amount of light is detected, the flash is electronically shut off instantaneously.
In 1999, Nikon released its first digital SLR, the D1. The new problem then was that the digital sensor and the anti-aliasing filter in front of it did not reflect light the same way traditional film does. As a result, Nikon had to modify its TTL flash technology as it was no longer possible to measure the amount of reflected light during the actual exposure. Instead, Nikon used pre-flashes and measured their strength to determine how much flash power was needed.
The initial technology was called D-TTL. It is merely a slight modification from film TTL. Instead of measuring the light reflected off the film during actual exposure, D-TTL carries out a quick series of pre-flashes after the mirror has flipped up but before the shutter opens. On D-TTL DSLR bodies, the outward-facing side of the shutter blades is painted light gray to reflect more light so that it would be easier to measure the pre-flash. Flash metering is still carried out by sensors placed inside the mirror box as before.
Correspondingly, Nikon also made a slight modification to its last film flash, the SB-28, into the SB-28 DX. All three D-TTL flashes Nikon would eventually introduce all have the “DX” suffix. (Subsequently, there were also the SB-50 DX and SB-80 DX.)
The D-TTL era lasted four years and Nikon only introduced four DSLRs that use D-TTL exclusively: the D1 family: the D1, D1H and D1X and the subsequent D100 in 2002. However, the entire D2 family is also backwards compatible with D-TTL; in fact, they are the only cameras that are both D-TTL and i-TTL compatible.
i-TTL and the Creative Lighting System (CLS)
In July 2003, Nikon announced the D2H, the first of what would be four cameras from the D2 family, along with a new SB-800 flash. They were the first installment to Nikon’s iTTL and Creative Lighting System (CLS). The new triple-digit model number without the DX suffix indicated the new flash technology. The pre-flash is still required for digital, but it takes place slightly earlier in the exposure cycle, before the mirror flips up. Therefore, pre-flash exposure is measured inside the viewfinder instead of inside the mirror box.
In addition to TTL flash, CLS is a complex system of master and remote wireless flashes. There can be up to a total of three groups (A, B and C) of wireless remote flashes that can be controlled independently with different exposure compensations. There are also four separate channels (1 to 4) so that multiple photographers will not interfere with one another in the same room.
Nikon Flash Terminologies
- TTL: Through-the-Lens flash metering
- TTL-BL: Balanced fill flash between flash and ambient light
- TTL-FP: Focal Plane flash: permits flash photography with a shutter speed faster than the camera sync speed, which is typically 1/250 sec or 1/200 sec on Nikon DSLRs. In the * TTL-FP mode: the flash uses a sequence of pulse flashes to get round the sync speed limitation so that it can sync with as fast as 1/8000 sec but at reduced flash power. The higher the shutter speed, the greater the flash power reduction.
- A: Auto, instead of using TTL flash with a flash meter inside the camera to measure the amount of flash, use a flash metering sensor built inside the flash to control the flash level. Among iTTL flashes, this feature is only available on the SB-800 and SB-900
- M: manual, control the flash level manually at full, 1/2, 1/4, 1/8…typically at 1/3-stop increments.
Nikon Flash Specifications
| SB-900 | SB-800 | SB-600 | SB-400 | |
| Guide Number at ISO 200 | 157.5 (feet) | 174 | 138 | 98 |
| Weight (w/out batteries) | 15.1oz, 427g | 12.4oz, 350g | 10.8oz, 306g | 4.5oz, 128g |
| Battery Type | 4 AA | 4 AA, 5 AA | 4 AA | 2 AA |
| Recycle Time with NiMH AA Batteries | 2.3 sec | 4 sec, 2.9 sec with 5 AA | 2.5 sec | 2.5 sec |
| High-voltage Input | yes | yes | — | — |
| Swivel Head for Bounce Flash | yes | yes | yes | horizontal only |
| CLS Master | yes | yes | — | — |
| CLS Slave | yes | yes | yes | — |
| Zoom Head | 24-200mm FX/DX adjustment | 24-105mm FX coverage | 24-85mm FX coverage | fixed at 27mm FX (18mm DX) |
| Flip-out Diffuser Coverage | 17mm FX 11mmDX | 17mm | 14mm | — |
| Add-on Diffuser Dome Coverage | 17mm FX 11mm DX | 14mm | not supplied | not supplied |
| D-TTL | — | yes | yes | — |
| Film TTL | — | yes | yes | — |
| A Mode (non-TTL auto flash) | yes | yes | — | — |

Nikon SB-800 Flash with SD-8A Power Pack
Conclusion
For those who own current Nikon DSLRs (as well as the F6 film SLR), i-TTL and CLS is simply a wonderful flash system that can be as simple as just the built-in pop-up flash, one external flash, or it could be a complex, multi-flash system that works in a coordinated manner.
If you are a more casual digital photographer taking the typical family and travel images and would like something a bit stronger than the camera’s built-in flash, the SB-400 would be a good, affordable choice without any advanced features.
For the more intermediate to advanced photographers, the SB-600 is still quite affordable but is packed with useful features such as horizontal and vertical bounce flash as well as serving as a wireless remote.
For serious amateurs to professional photographers, especially those who are into wedding, wildlife, news, and certain types of sports photography, the SB-800 and SB-900 should be the best tools because of their power and fast recycle times. Additionally, for a lot of indoor, controlled settings, multiple Nikon CLS flashes can work together to produce beautiful results. At this point the SB-900 is certainly state of the art, but some may find its large size to be somewhat inconvenient.
Additonal Learning
Shortly after I had written this article, I bought a copy of Nikon School’s new DVD: A Hands-on Guide to Creative Lighting, featuring professional photographers Bob Krist and Joe McNally. I watched the entire DVD immediately and then repeated some selected sections. The DVD is a bit pricy but provides an excellent presentation on the entire Creative Lighting System. The DVD has two main sections. First Bob Krist reviews the basics about the quality of light and then builds a three-flash set up for a typical portrait session, one flash at a time. He also describes how to operate the SB-900, 800, 600, and R200.
The second part of the DVD features Joe McNally with Bob Krist assisting him at three locations: (1) the Boston Ballet photographing several dancers in both action and group portrait settings, (2) a bridal portrait session at a country inn, and (3) a fisherman portrait set up in a New England harbor where McNally eventually uses a total of a dozen i-TTL flashes working in coordination. They demonstrated many different CLS setups under many different real-life settings.
If you would like to learn more about lighting with Nikon i-TTL flashes and how the system works together in actual settings, this DVD is a really good way to go.
Monday, May 11, 2009


Subscribe to:
Posts (Atom)